ABS 3D Printing: A Complete Guide to Material Properties, Settings, and Best Practices
ABS 3D Printing: A Complete Guide to Material Properties, Settings, and Best Practices
Quick verdict: ABS is the filament you choose when a part has to survive heat, impact and handling rather than sit on a shelf looking tidy. It is tougher than PLA, keeps its shape at temperatures that soften PETG, and machines like a conventional engineering plastic. It also insists on an enclosed printer, a hot bed and real ventilation. Get those three things right and ABS becomes one of the most useful materials in the workshop.
ABS has been the default functional filament in fused deposition modelling for longer than most desktop printers have existed. That reputation was earned: the material absorbs knocks, tolerates warm environments, and can be drilled, tapped and sanded after printing. It is also unforgiving about cooling, which is where most failed prints come from.
This guide covers what ABS is made of, the properties that decide whether it suits your part, the slicer settings that work as a starting point, how to stop it warping, safety in an enclosed print room, and the post-processing steps that turn a rough print into a finished component.
What ABS actually is
ABS is a thermoplastic built from three monomers: acrylonitrile, styrene and butadiene. Each one pulls its weight in the finished material.
Acrylonitrile brings rigidity, strength and resistance to chemicals.
Styrene gives ABS its smooth, glossy surface.
Butadiene, the rubbery component, supplies the toughness that lets a part flex instead of shattering.
The material was first patented in 1948 and spread quickly through automotive manufacturing, consumer electronics and construction. Its move into 3D printing followed the technology itself: as FDM machines became common, ABS became the material people reached for when a print had to do a job.
One practical difference from PLA is origin and end of life. PLA is plant-derived and biodegradable; ABS is petroleum-based and does not biodegrade. It can be recycled, and recycled ABS is routinely processed into sheets, trays and automotive components. For a workshop generating scrap from failed prints and support material, that recycling route is worth knowing about, even if the loop is industrial rather than desktop.
ABS material properties
What separates ABS from the easier filaments is the balance between impact behaviour and heat tolerance. The table below lists values commonly published for ABS filament, with a note on what each one means when you are specifying a part.
Property
Typical ABS value
What it means for your part
Impact strength
200-215 J/m
Absorbs sudden loads; PLA measures around 26 J/m in the same test
Tensile strength
43 MPa
Enough for brackets, housings and load-bearing fittings
Flexural modulus
Roughly 2,400 MPa
Stiff under bending, so panels and enclosures hold their shape
Elongation at break
10-50%
Yields and stretches before failure instead of snapping
Young modulus
1.79-3.2 GPa
Rigid enough to replace small moulded plastic parts
Hardness
Shore D 100
Resists scratching in handling and assembly
Glass transition temperature
Around 105°C
Continuous service up to roughly 100°C
Thermal conductivity
0.17-0.23 W/mK
Low, so heat stays local and cooling is uneven
Density
1.03-1.14 g/mL
Comparable to other engineering filaments, so part mass is predictable
Three of these entries matter more than the rest. Impact resistance is why ABS outlasts PLA in parts that get dropped, clamped or knocked about. The glass transition temperature is why an ABS enclosure left in a parked car or beside a machine keeps its shape. And the low thermal conductivity is the root cause of most ABS printing trouble: heat leaves the part slowly and unevenly, which pulls the material in different directions as it cools.
ABS is also easy to machine after printing. It drills cleanly, takes a thread, sands without clogging, and cuts with hand tools. It resists moisture absorption far better than nylon, so storage and drying demands are lighter. That combination is what makes it a workshop material rather than a display material.
How ABS compares with PLA, PETG, ASA and nylon
Deciding on ABS is really a question of what the part has to endure. The comparison below sets out where each common filament sits.
Material
Heat resistance
Toughness
Print demands
Where it wins
ABS
Continuous use near 100°C
High, especially under impact
Hot end up to 250°C, bed at 95-110°C, enclosure, ventilation
Easiest of the group, no heated chamber needed, no odour
Concept models, fittings with no load, quick shop fixtures
PETG
Around 80°C ceiling
Good, though less than ABS on impact
Easier than ABS, better layer adhesion, some warping
Chemical contact, general functional parts, faster turnaround
ASA
Similar to ABS
Similar to ABS
Similar to ABS: enclosure and a hot bed
Outdoor and UV-exposed parts where ABS would chalk and fade
Nylon
High, above ABS
Highest of the group, with strong abrasion resistance
Higher printing temperatures, dry filament, tight moisture control
Gears, wear surfaces, living hinges, chemical exposure
Against PLA the difference is straightforward. PLA is stiffer and prints without fuss, but a PLA bracket cracked by a sudden load or softened by summer heat is a failed part. ABS bends, recovers, and holds its geometry when the ambient temperature climbs. Set that against the fact that PLA prints with no enclosure and no smell, and the choice usually comes down to whether the part carries load or heat.
PETG sits between them and is often the pragmatic answer for general workshop parts: easier to print than ABS, with better layer bonding and less warping. Its limit is heat. Once a component sits near 80°C for long periods, PETG creeps and ABS does not. PETG is also less tough under impact, so anything that takes a strike belongs in ABS or a nylon.
Nylon beats ABS on toughness, chemical resistance and abrasion, which is why gears and wear parts often go that way. It also demands more from you: higher nozzle temperatures, careful drying, and protection from moisture in storage. If you want functional strength without a humidity regime, ABS is the more forgiving route.
ASA deserves its own line because it is ABS’s closest relative. It behaves much like ABS in a printer, needs the same enclosed setup, and adds far better resistance to sunlight and weather. Where a part will live outdoors, on a machine guard or a vehicle exterior, ASA is usually the better pick. Where the part stays indoors, ABS is the more available and more economical choice, and it comes in a wider range of colours.
Best ABS printer settings
Treat the numbers below as a starting point for a typical ABS formulation. Filament suppliers adjust their blends, and the datasheet that comes with your spool overrides anything here.
Setting
Starting point
Why
Extruder temperature
220-250°C, with 230-250°C the most common range
Below 220°C layer bonding suffers and parts delaminate
Bed temperature
95-110°C
Use 110°C on large parts to hold the first layer flat
Print speed
30-60 mm/s
Pushing faster than this raises the warping risk and weakens bonds
Layer height
0.1-0.2 mm
Thicker layers cool more slowly but show more visible stepping
Part cooling fan
Off, or no more than 30% after the first layer
Excess cooling is the quickest way to make ABS curl
Retraction
3-6 mm at 25 mm/s
Controls stringing without pulling the melt too far back
Wall thickness
Minimum 1.5 mm on functional parts
Thin walls leave the part brittle and prone to cracking
Infill
20-50%, rising to 50-80% for load-bearing parts
Match density to the load rather than defaulting to solid
Two habits make these settings work harder. Print the first layer slowly and generously, because everything above it depends on that foundation being flat. And keep the part cooling fan honest: some slicer profiles turn it on by default for PLA, and that single leftover setting explains a large share of warped ABS prints.
Build surface and bed adhesion
First-layer adhesion decides whether an ABS print succeeds. The material needs a surface that grips while hot and releases when cold, and it needs that surface hot enough. There are four approaches that work in practice.
Kapton (polyimide) tape: applied to a heated glass bed, it grips well and tolerates the temperatures ABS requires. Wipe it with isopropyl alcohol before every print.
ABS slurry: scrap ABS dissolved in acetone and spread thinly on glass. Hot ABS bonds to it chemically, which produces the strongest hold of the four. Mix it yourself from failed prints or buy it ready-made.
PEI sheet: a durable surface that grips ABS well when heated and needs almost no preparation. It survives repeated use, which suits production runs.
Glue stick on heated glass: the simplest option and the cheapest to try. Adhesion is less consistent than the others, but it is a reasonable starting point before you commit to a dedicated surface.
Whichever surface you use, clean it. Fingerprint oils and dust are a common reason for a first layer that sticks in the middle and lifts at the corner.
Preventing warping and shrinkage in ABS parts
Warping is the defining ABS problem, and the cause is predictable. As the material cools from extrusion temperature back to room temperature it contracts by roughly 0.5-0.8% linearly. On a large flat part that contraction happens unevenly: the top of the part is cooling while the bottom stays pinned to a hot bed, and the resulting stress lifts the corners. Thin edges and long unsupported spans are the first to curl.
The fix is to reduce the temperature difference across the part. Everything below does that in one way or another.
Enclosure and heated chamber
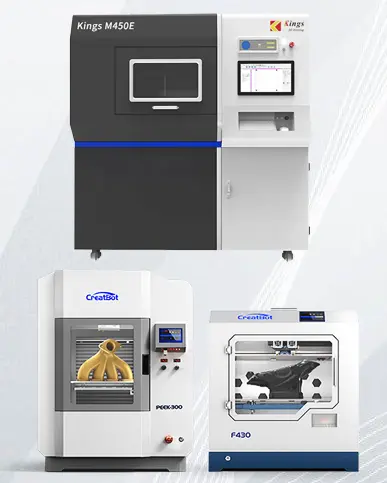
The most effective measure is printing inside a heated chamber held at around 45°C. The chamber slows cooling, so the part reaches room temperature gradually and the stress never builds. Machines built for this, including the heated-chamber FDM lines from CreatBot and Intamsys, exist precisely because the chamber is a requirement for engineering materials, not a convenience.
If your printer is open, an enclosure made from acrylic panels or even folded board around the frame traps enough heat to make a visible difference. A simple enclosure also keeps fumes inside one space, which matters for the safety section below. It is one of the cheapest improvements you can make to an ABS setup.
Brims, rafts and first-layer strategy
Brim: a flat skirt printed around the base on the first layers, which multiplies the surface area holding the part down. Fast and light on material.
Raft: a sacrificial platform printed under the whole model. It absorbs the warping forces and gives a flat starting surface, at the cost of material and print time.
First-layer temperature boost: running the first three to five layers 10-20°C above the target temperature improves bonding to the bed and reduces the chance of the part detaching later.
Orientation and layer alignment
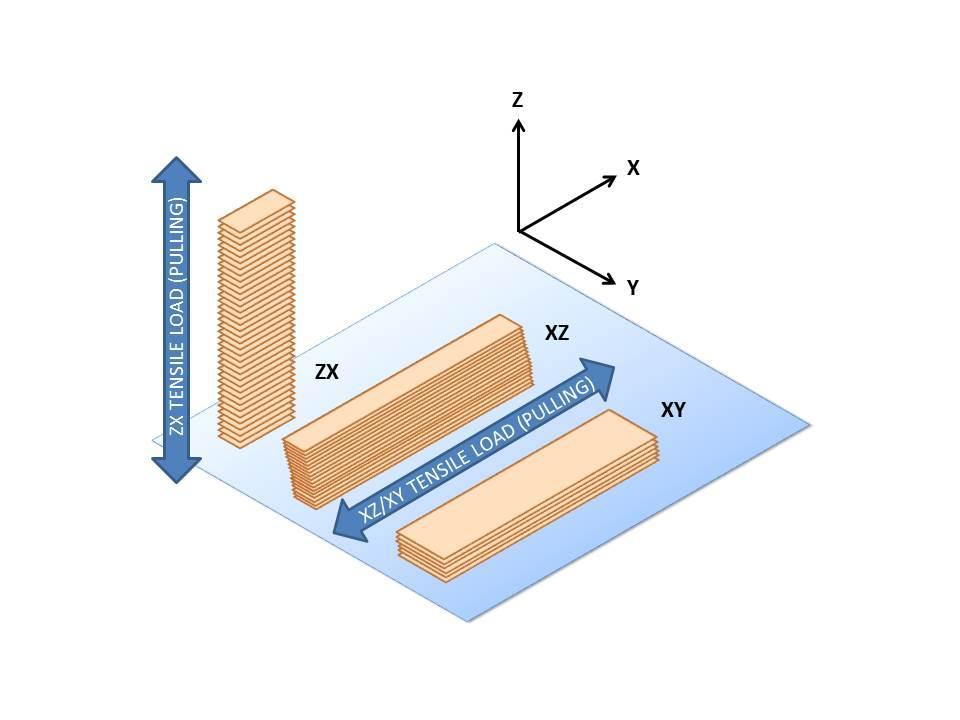
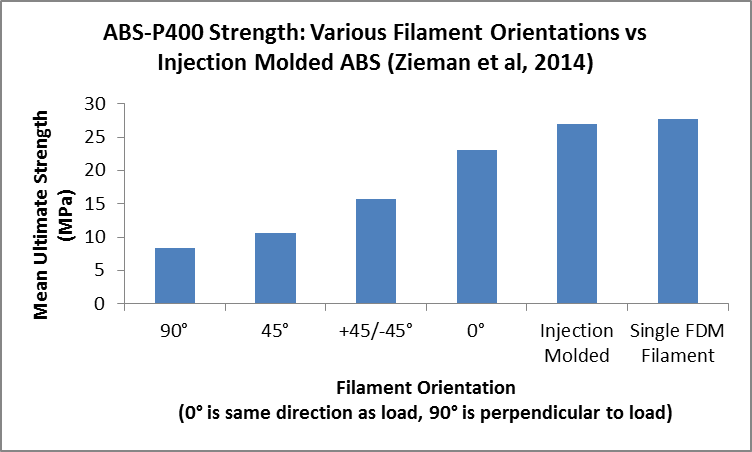
Layer orientation changes how strong an ABS part actually is. Test parts printed with the filament paths running at 0 degrees to the applied load behave close to injection moulded ABS. Rotate that part so the load pulls across the layer bonds and strength drops steadily. The chart opposite shows the trend: the material has not changed, only the direction of the layers relative to the force.
Practical consequences for design and print setup:
Place the main load path parallel to the build plate, in the XY plane, where extrusion direction carries the stress.
Avoid orientations that leave layer boundaries perpendicular to the dominant load, since that is the weakest plane in any FDM part.
For parts under repeating or fatigue loading, alternating layers at +45 and -45 degrees spreads the load across more bonds than a single direction does.
Do not rely on thin walls in the Z direction. Layer adhesion is the limiting factor in the vertical axis, and no slicer setting removes that.
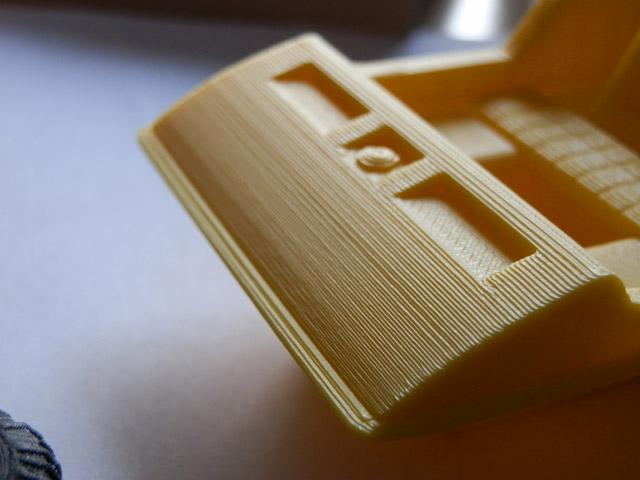
Expect the staircase effect on shallow slopes, where visible layer lines reduce both surface quality and local strength.
ABS safety: fumes, ventilation and filtration
ABS printing releases styrene among other volatile compounds, and styrene is classified as a potential human carcinogen. In a poorly ventilated room, exposure builds to levels that cause headaches and irritation, and sustained exposure is a genuine health concern rather than a smell to be tolerated.
Four practices cover most of the risk:
Ventilate the print area. Put the printer where air moves. Indoors, open windows or run an exhaust fan that keeps pulling air out of the space.
Filter at the machine. Many enclosed printers accept HEPA and carbon filtration that captures ultrafine particles and reduces fumes at the source.
Route exhaust outdoors. A flexible duct from the enclosure to a window or outside wall removes fumes from the room rather than diluting them in it. This is the single most effective measure.
Never print unattended in a sleeping area. Do not run long ABS jobs overnight in a room where people sleep without active ventilation or filtration.
Enclosure design and safety pull in the same direction here. A sealed chamber with filtration and ducted exhaust protects the print from draughts and protects the operator from fumes at the same time.
Post-processing ABS parts
The stepped face in the photo is what post-processing has to remove. Shallow slopes show every layer boundary, so a part that looks acceptable on a vertical wall can look rough on an inclined one. Plan the finish before you print: orientation decides how much sanding the part will need.
Sanding and machining: start with 220 grit, then work through 400, 600 and 800 before priming or painting. ABS sands easily by hand or with power tools and does not clog paper the way softer materials do.
Acetone vapour smoothing: acetone vapour dissolves the outer skin of the part and lets it flow level, producing a glossy surface with the layer lines gone. The result depends almost entirely on control. Too much vapour exposure and the part sags or loses detail, so work in short passes, keep the chamber ventilated, and check the part between passes rather than leaving it in.
Priming and painting: ABS accepts spray primers and paints well. Use a plastic-compatible primer for adhesion and sand lightly between coats.
Solvent welding and adhesives: acetone brushed between two ABS surfaces fuses them permanently, which makes hidden joints and repair work straightforward. ABS cement and epoxy adhesives work where a solvent weld is not practical.
Where ABS earns its place
The properties stack up in a specific set of jobs. ABS suits parts that are handled, loaded, warmed or machined, and it is less suited to parts that only need to look precise.
Functional prototypes: the material survives assembly, fit checks and repeated handling that would crack a PLA prototype. When a prototype has to be tested rather than shown, ABS is the sensible default.
Automotive hardware: interior trim, mounting brackets and parts near engine heat benefit from the thermal tolerance and impact resistance. Many aftermarket automotive fittings are injection moulded in ABS, so printed ABS matches the surrounding material.
Electronic enclosures: ABS insulates electrically and machines cleanly, which suits housings for control gear, power tool casings and consumer electronics that need cut-outs and threads.
Jigs, fixtures and tooling aids: workshop aids printed in ABS tolerate solvent contact, knocks and warm environments better than the same parts in PLA.
Toys and consumer products: the material has held the market’s best known building brick together since 1949, which says something about repeated assembly and disassembly.
Cosplay and props: toughness, machinability and the option of acetone smoothing make ABS a common choice for detailed pieces that get worn and handled.
For larger runs, or parts that need consistent mechanical values, industrial FDM systems with heated chambers take the same material and remove the chamber variable. That is worth discussing if ABS is moving from one-off prints into a production process.
Frequently asked questions
Does ABS really need an enclosure?
An enclosure is what makes ABS reliable rather than occasional. It holds warm air around the part, which slows cooling and reduces the temperature gradient that causes warping. A heated chamber at around 45°C is the best version of this, but any enclosure that traps heat around the print helps. Without one, you can still print small ABS parts, but large flat geometry will fight you.
Can ABS be printed without a heated bed?
Not reliably. ABS needs a bed at 95-110°C to hold the first layer flat while the rest of the part cools, and a bed at 110°C is what large parts need. On a cold bed the first layer contracts and releases within minutes.
Why do my ABS parts crack between layers?
Layer separation is nearly always a temperature problem. An extruder running below 220°C, a fan blowing too hard, or a chamber that is too cold all leave each new layer too cool to fuse with the one beneath it. Raise the nozzle temperature into the 230-250°C band, reduce or disable part cooling after the first layer, and check that the enclosure is actually holding heat. Orientation matters too: a part loaded across its layer bonds will split at a fraction of the force it would carry along them.
Is acetone smoothing difficult to control?
The technique is simple but the margin is narrow. Acetone vapour melts the surface of the part, so exposure time and vapour concentration decide whether you get a glossy shell or a deformed part. Work in short passes with good ventilation, away from any ignition source, and inspect between passes instead of leaving the part in the chamber.
What is the difference between ABS and ASA?
Chemically they are close relatives and they print in much the same way, both needing an enclosure and a hot bed. ASA adds strong resistance to ultraviolet light and weather, so it holds colour and surface finish outdoors where ABS gradually chalks and fades. Choose ASA for exposed exterior parts and ABS for everything indoors, where it costs less and is easier to source in the colour you want.