Desktop SLA 3D Printing: How Resin Printers Build a Part Layer by Layer
Desktop SLA 3D Printing: How Resin Printers Build a Part Layer by Layer
A filament printer leaves visible layer lines on almost everything it makes. A resin printer cures liquid photopolymer with light and turns out parts that come off the platform smooth enough to show a client, fit into a small assembly, or go straight into a casting workflow. This guide explains how stereolithography builds a part layer by layer, how laser, DLP and masked LCD machines differ, which resin family suits which job, and what the machine really asks of your workshop.
Quick verdict: Desktop SLA and its masked LCD relatives win on detail and surface finish, and nothing else in their class comes close. Resin is the right choice when parts are small, finely featured and judged on how they look or how they fit. Stay with FDM when parts are large, load-bearing, or made from engineering plastics that no photopolymer can match.
What stereolithography is
Stereolithography is the original additive process. It was commercialised in the 1980s, long before filament printing reached a workshop bench, and the principle has barely changed since: hold a liquid photopolymer in a vat, cure one thin cross section of the model onto a platform, then move the platform by exactly one layer and cure the next cross section on top of it. Repeat until the model is finished.
Liquid resin sets because it absorbs light of the right wavelength. Photoinitiators inside the resin start a chain reaction when UV or near-UV light reaches them, and the liquid becomes a solid polymer in seconds. Everything else follows from that reaction. It is also why the machine types sold today are more alike than their names suggest: laser, projector and LCD mask are simply three ways of delivering the same light to the same chemistry.
How a resin printer builds a part, layer by layer
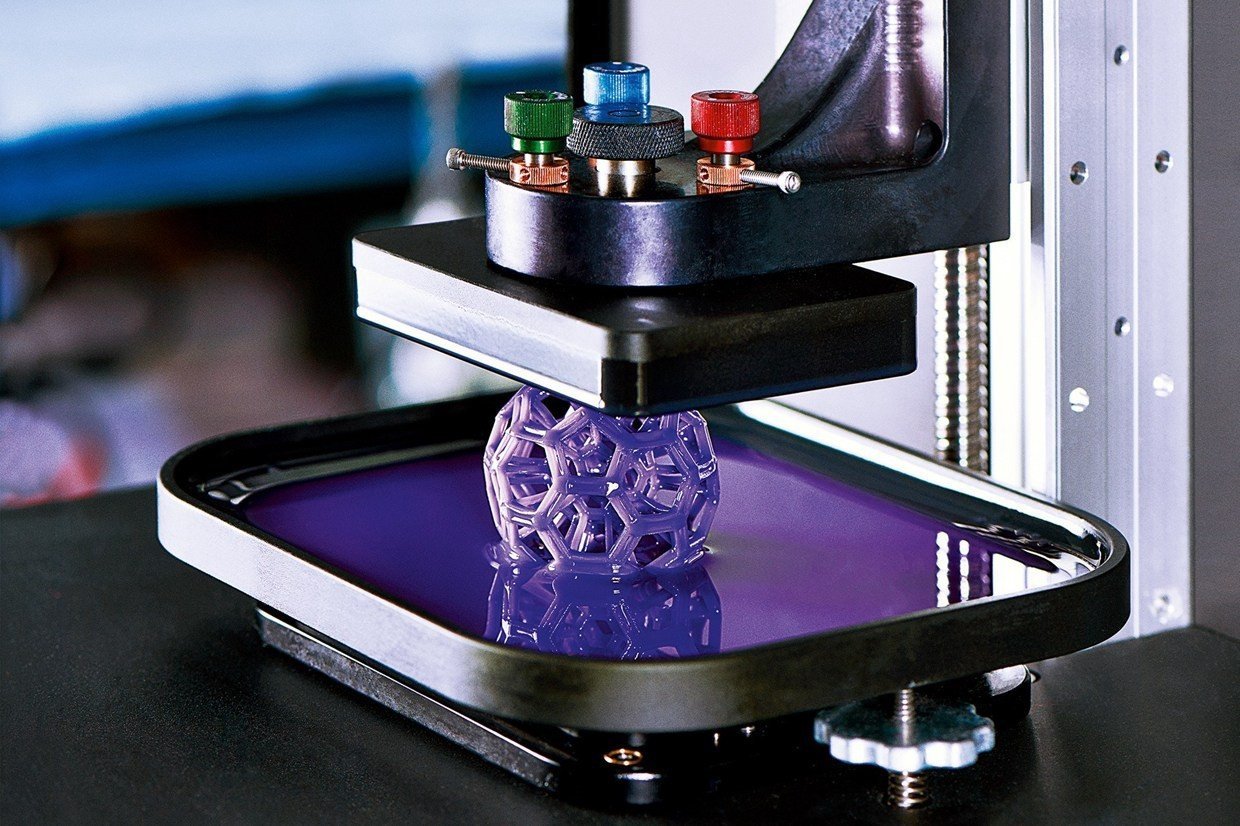
Almost every desktop machine on the market is inverted. The build platform hangs down into the vat and climbs as the part grows, so each layer is cured against the underside of a transparent film, usually called the release film. The design keeps the resin surface flat, uses far less resin than a full vat would, and holds the machine to a compact footprint.
Slice the model. Slicing software cuts the CAD file into horizontal sections, typically 25 to 100 microns thick, and generates supports wherever the geometry overhangs or begins in mid-air.
Prepare the platform and vat. The build plate is levelled against the film, and the vat is filled to its working level with filtered resin.
Lower the platform. The plate descends until only one layer thickness of resin is left between it and the film.
Cure the cross section. The light source solidifies the resin in the shape of that slice. A laser traces the outline and fills it in; a projector or LCD screen exposes the whole layer at once.
Peel and raise. The platform lifts, peeling the fresh layer off the film, then descends again for the next slice.
Repeat to the top. Hundreds or thousands of layers later, the finished part hangs from the platform, still coated in uncured resin.
Layer thickness on an inverted machine is set mechanically by the Z axis, so it stays consistent from the first layer to the last. Exposure is what changes between machine types. A laser has to trace every millimetre of the cross section, while a projector or an LCD screen solidifies the whole area in a single flash. Filling a plate with small parts costs almost no time on a masked machine and a great deal of time on a laser machine.
Every resin machine cures the same liquid photopolymer; what differs is how the light is delivered to each layer
Laser SLA, DLP and masked LCD
Laser machines, usually just called SLA, aim a focused UV laser through galvanometer mirrors that steer the beam across the resin surface. Spot size sets the smallest feature the machine can draw, and the process is serial by nature, because the beam can only be in one place at a time.
DLP replaces the laser with a digital projector. A micromirror chip throws the entire cross section onto the resin as one image, so layer time barely depends on how much of the plate is filled. Small, high-detail parts in batches are the natural fit, which is why dental labs took to the technology early.
Masked SLA, sold as MSLA or LCD printing, puts an array of UV LEDs behind an LCD screen. The screen works as a mask: pixels that are on pass light through, pixels that are off block it. The layer cures in one exposure like DLP, but the light engine is simpler and the screen becomes the wear item. Panel resolution has climbed quickly, with 4K and higher panels now common, and monochrome panels cure faster than older colour screens because they pass more UV.
Technology
Light source
How each layer is cured
Detail
Best fit
Laser SLA
Focused UV laser steered by mirrors
Beam traces the cross section point by point
Very fine and uniform across the plate
Fine detail, dental and jewellery patterns, engineering models
DLP
Digital projector with a micromirror chip
Whole layer projected in one flash
Fine, set by pixel size and optics
Small detailed parts in volume, dental labs
Masked SLA (MSLA / LCD)
UV LED array behind an LCD mask
Whole layer exposed through the screen at once
Fine, set by panel pixel size
Larger desktop build volumes, general workshop and studio work
All three cure at similar wavelengths, and the resin has to match. Most desktop resins are formulated for 405 nm, which is what the majority of LCD and laser-diode machines emit. Some DLP systems run at 385 nm and need resin made for that wavelength. A resin matched to one will not cure reliably on the other, so check the label before you buy a case.
Resin types and what each one is for
Resin is where most of the decision-making happens. Two machines with identical build volumes produce completely different parts depending on the liquid in the vat, and the spread between resin families is far wider than the spread between brands of filament in the same family. Pick the resin for the job, then the machine that runs it well.
Still softer and less stiff than a machined plastic
Flexible / rubber-like
Rubber-like resilience with high elongation
Gaskets, seals, grips, dampers, overmould trials
Thin sections tear during support removal
Castable
Burns out of a plaster mould with little residue
Jewellery patterns, cast metal parts, dental castings
Needs a complete wash and cure to burn out cleanly
Dental
Biocompatible grades matched to the intended contact
Models, surgical guides, splints, crowns and bridges
Valid only with the printer, wavelength and cure protocol the material is cleared for
High temperature
Holds stiffness and shape at temperatures that soften standard resin
Moulds, forming tools, heat-exposed fixtures and inserts
Not a replacement for metal tooling in a long production run
Water-washable
Washes in water with a mild detergent instead of solvent
General models and prototypes where solvent handling is awkward
Still needs the full UV cure, and the wash water becomes waste
Two things are worth remembering when you choose. Hardness and toughness are different properties: a tough resin survives a drop and a snap fit, a hard resin keeps a sharp edge and resists scratching, and few formulations do both well. Second, every family comes with a cure protocol from the supplier covering wash time, cure time and cure temperature. Following it is the difference between a part that stays true to the drawing and one that drifts, stays tacky, or warps in the weeks after it leaves the bench.
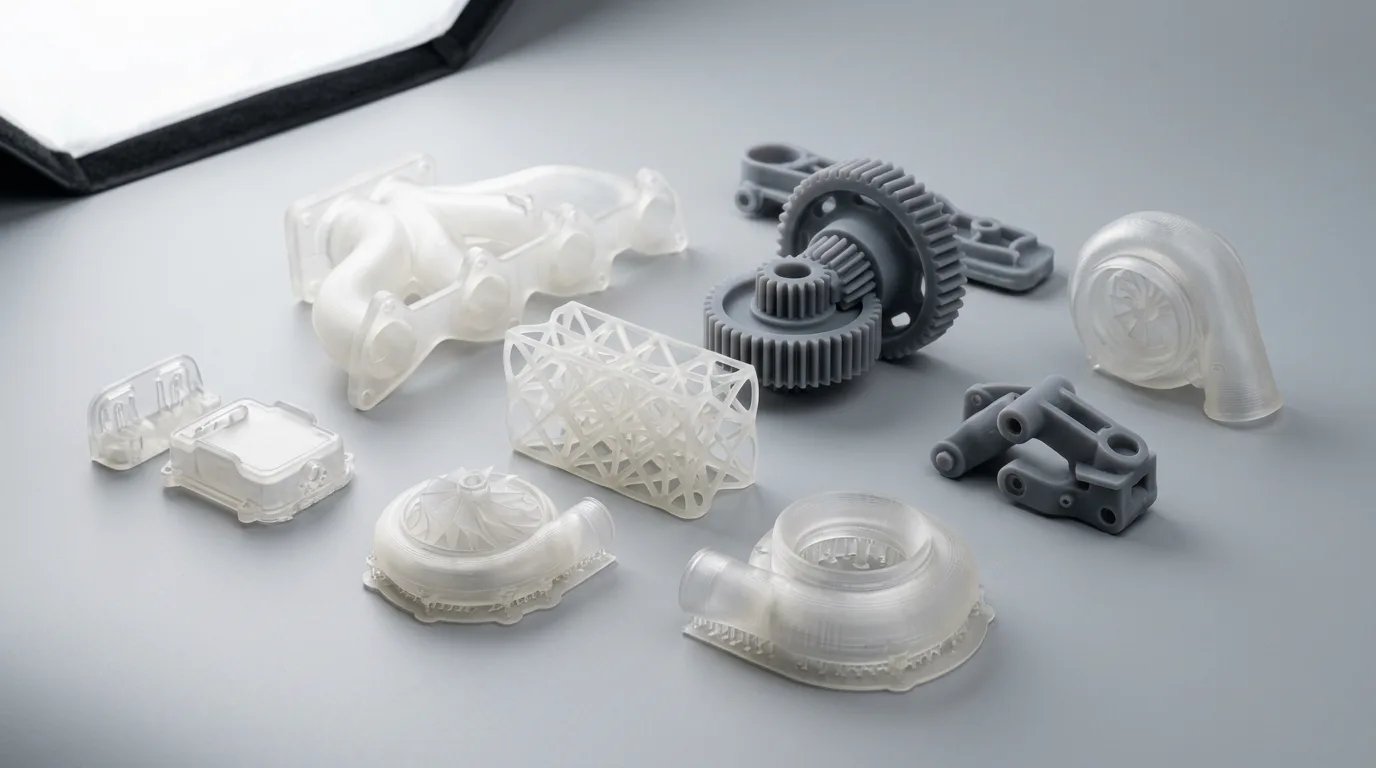
Resin parts come off the platform smooth enough to skip sanding, which is where they beat FDM on finish
Resolution and surface finish compared with FDM
This is the clearest divide between the two processes, and the one that decides most purchases.
FDM lays down a molten bead, and the bead has a shape. Layer heights usually sit between 0.1 and 0.3 mm, so the stair-stepping on a sloped surface is visible to the naked eye and readable under a fingernail. Getting a smooth FDM part means sanding, filler primer, or a smoothing process, and each of those adds a step and a risk of pulling the part out of tolerance.
Resin cures flat against a film and then in thin slices, so the surfaces it produces are smooth straight off the platform. Layer heights of 25 to 100 microns are normal on desktop machines, and that alone is a fraction of a typical filament layer. The smallest feature a resin machine can hold is set by the laser spot or the panel pixel, both of which are usually finer than the bead a nozzle lays down. Fine detail is not a trick of the resin, it is a consequence of curing a liquid rather than extruding a solid.
Two limits are worth knowing before you plan a job around those numbers. Photopolymers shrink as they cure, and the slicer compensates for it, but thin flat sections can still bow. And on a masked LCD machine, the particle size of the pigment in the resin and the light scattering inside the vat set a floor on what any pixel size can resolve. A cheaper resin will throw away the advantage of an expensive panel.
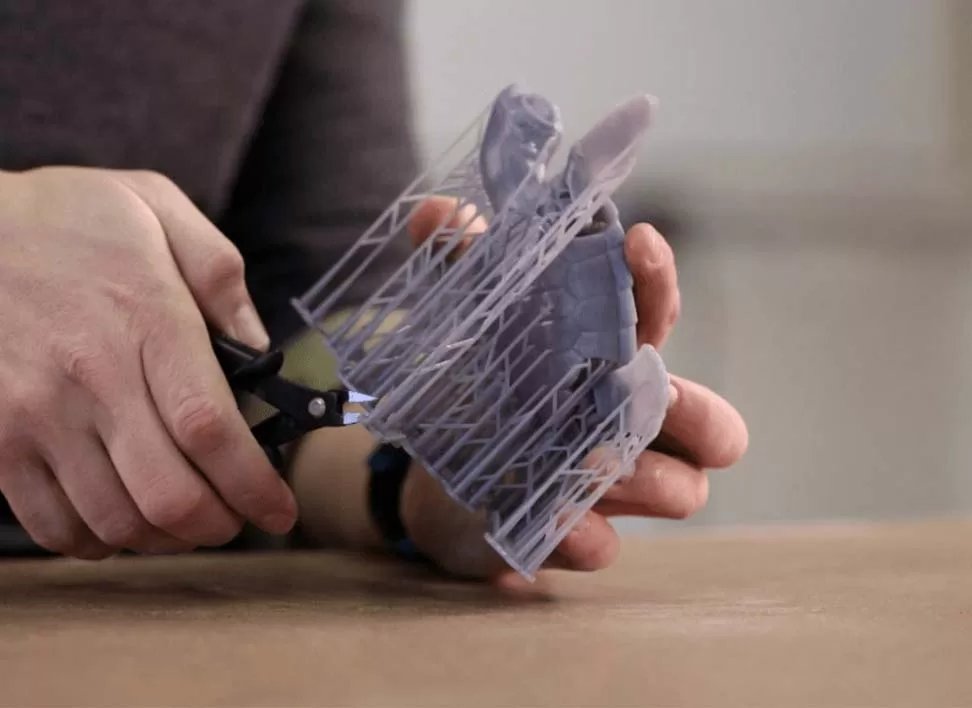
Support removal is the step newcomers underestimate: the part is not finished until the lattice is off
The post-processing workflow
A resin print is half finished when the machine stops. Uncured resin clings to every surface, and it has to come off before the part is handled, used, or cured properly.
Drain. Lift the platform and let excess resin drip back into the vat. Tilting it over the vat recovers resin that would otherwise be washed down the drain.
Take the part off the plate. Remove it with a scraper, working with the plate flat and the part supported so thin features are not bent.
Wash. Submerge the part in isopropyl alcohol, agitating gently so fresh solvent reaches every surface. A two-stage wash, dirty then clean, keeps the second bath usable for longer. Water-washable resins replace the alcohol with water and a mild detergent.
Remove supports. Clip them with side cutters or flush cutters and dress the witness marks with a blade or fine file. Most workshops remove supports after the wash and before the final cure, while the resin is still slightly forgiving. Very small or delicate parts are easier to handle after a short pre-cure firms them up.
Cure. Put the part in a UV curing station and turn it so every face sees the light. The time depends on the resin, the wall thickness and the chamber, so follow the supplier’s schedule rather than a habit.
Finish. Sand, polish, prime or paint. Dental and jewellery work often goes further, polishing to a gloss or preparing the surface for casting.
Neither the wash nor the cure is optional. A part that is washed but not cured stays soft and slightly tacky and never reaches its stated properties. A part that is cured without a proper wash traps uncured resin under a cured skin, and that resin can seep out later and irritate skin. Support placement deserves the same attention: put supports where they will not scar a visible face, or where you can sand the mark away.
Workshop requirements: ventilation, gloves, resin handling and waste
Resin is not a fume-heavy process like welding, but uncured photopolymer is a skin sensitiser and gives off volatile organic compounds. Repeated skin contact can produce a reaction that gets worse with exposure, so the handling rules are worth setting up properly from day one rather than after a rash.
Ventilation. Give the printer moving air: a window with an extractor, or an enclosure with a carbon filter. A spare bedroom or a shared office is the wrong home for a resin machine.
Gloves. Nitrile, not latex. Resin passes through latex gloves quickly. Keep a box beside the printer and change gloves whenever they get wet with resin.
Eyes and skin. Safety glasses for any pouring or vat work. Resin splashes hurt, and UV curing lights should never be looked into directly. If resin reaches skin, wash with soap and water, not with the wash alcohol.
Resin handling. Keep the vat covered when the machine is idle, keep bottles sealed and out of sunlight, and filter resin back into its bottle through a mesh filter rather than pouring it through open air.
Temperature. Resin thickens as it cools. A cold air-conditioned room slows draining and can cause failed layers, which is why some machines and vats are sold with heaters.
Waste. Never pour resin or contaminated solvent down a drain. Cure waste resin and resin-contaminated paper in sunlight or a UV chamber until it is solid, then dispose of it as solid waste. Contaminated alcohol can be left to settle and cure out, then filtered and reused. Label every container.
None of this is difficult once the habits are in place. It does mean a resin machine belongs on a bench with a tray, a bin for cured waste, gloves and ventilation, not on a desk in a living space.
SLA against FDM: where each one wins
Factor
Resin printing (SLA, DLP, MSLA)
FDM filament printing
Typical layer height
25 to 100 microns
0.1 to 0.3 mm
Surface finish as built
Smooth on cured faces, close to a moulded part
Visible layer lines; needs sanding, filler or smoothing
Smallest feature
Set by laser spot or panel pixel, usually finer than a nozzle
Limited by nozzle diameter and bead width
Build envelope
Small to medium on desktop machines, with large masked LCD models available
Larger envelopes are common and easier to find
Speed
Whole layer cured at once on DLP and masked LCD; total time set by layer count
Set by nozzle travel and part volume; large simple parts can be quicker
Materials
Photopolymer resins, tuned family by family for detail, toughness, flexibility or heat
Thermoplastics, including engineering grades and fibre-filled materials
Toughness
Good in tough grades, more brittle overall, and can harden further with UV exposure
Better for load-bearing parts, particularly in engineering plastics
Supports
Generated for nearly every overhang, removed by hand, leaving witness marks
Needed only under overhangs; usually quicker to remove
Post-processing
Drain, wash in solvent, remove supports, cure under UV, then finish
Remove supports and finish; no washing or curing stage
Running consumables
Resin, wash solvent, release film and, on masked machines, the LCD panel
Filament, with the nozzle and build surface as wear items
Best for
Fine detail, smooth surfaces, small accurate parts, patterns and models
Functional parts, jigs, enclosures, large parts and engineering plastics
The choice is usually made by the part rather than the machine. A detailed figure, a crown, a ring pattern or a clear manifold for flow testing belongs on resin. A large bracket, a jig that gets clamped every day, or a duct in a fibre-filled grade belongs on an FDM machine. Where the two overlap, decide on how the part will be judged. If it will be looked at and handled, resin produces the better object. If it will be bolted, dropped and loaded, filament is the safer material.
Applications for desktop resin printing
Prototypes and engineering models
A resin model shows form, fit and finish long before tooling is committed. Clear resins let engineers see flow paths and internal channels, tough grades survive a snap-fit test, and a smooth surface makes an appearance model presentable without a paint shop. For anything small and detailed, resin shortens the loop between a CAD change and something you can hold.
Models, miniatures and display work
This is the market that made desktop resin printing common, and the technical reason is straightforward. Fine layers plus fine pixels resolve detail that a filament bead simply cannot, and the surface needs little work before it is primed. Tabletop figures, scale models, collectibles and architectural models all live here.
Dental
Dental labs were early adopters and remain one of the biggest users. Models printed from an intraoral scan, surgical guides, splints, and casting patterns for crowns and bridges all come off desktop resin machines. Dental resins are formulated and validated for the specific contact they will have with the patient, so the material, the printer wavelength and the cure protocol travel together as a system. The chain starts with a scan, and matching the scanner to the printer is part of getting a clean result.
Jewellery
Jewellers print patterns rather than finished pieces. A castable resin burns out of an investment mould cleanly, replacing hand-carved wax for intricate work and letting a design be duplicated exactly. Rings, settings and filigree detail that would take hours at the bench come out of the printer in one run, in a range of sizes, and go straight into the casting room.
Patterns, moulds and small-batch parts
Printed masters feed silicone moulds for resin casting, and high-temperature resins serve as forming tools and heat-exposed fixtures where standard resin would soften. For batches in the tens rather than the thousands, a printed pattern plus a mould is often the quickest route from a CAD file to a saleable part.
Choosing a desktop resin printer
Compare machines on the things that decide daily output, not on the headline resolution alone.
Build volume against your largest part. A machine that cannot print your common part in one piece will cost you joins and assembly time on every job.
Panel pixel size or laser spot size. This sets the smallest feature the machine can hold and the smoothness of curved surfaces.
Monochrome or colour panel. Monochrome panels cure faster and last longer, which matters on a machine that runs daily.
Open or closed material system. An open machine lets you run resin from any supplier that matches the wavelength, which gives you room to move as your work changes.
Consumables and spares. Release film and, on masked machines, the LCD panel are wear items. Ask how they are replaced and how quickly they can be supplied locally.
Resin temperature control. A heated vat helps in air-conditioned rooms and keeps draining and curing consistent through the year.
Local support. A resin machine that waits weeks for a panel is an expensive shelf.
Trinventor Solution supplies both ends of that range, including laser stereolithography printers for fine detail and masked LCD and DLP machines for larger parts and batch production, with Peopoly among the resin platforms we carry. If you need the front of the workflow as well, a desktop 3D scanner turns a physical part or a patient’s mouth into the STL the printer runs.
Frequently asked questions
What is the difference between SLA, DLP and MSLA?
All three cure liquid resin with light, and all three are stereolithography. SLA uses a laser that traces each layer point by point. DLP projects the whole layer at once with a digital projector. MSLA, also called masked SLA, shines an LED array through an LCD screen that acts as a mask. Laser machines tend to be the most consistent at very fine detail, while DLP and masked machines print faster because a whole layer cures in one exposure.
Is a resin part stronger than an FDM part?
Usually not in the way most people mean. A tough resin survives impact and snap fits well, but photopolymers as a group are more brittle and less stiff than engineering thermoplastics, and they can harden further as they age under UV light. For a load-bearing part, FDM in a suitable engineering plastic is the more sensible answer. For fine detail and a smooth surface, resin has no competition in its class.
Do I have to wash and cure resin prints?
Yes. A print comes off the platform coated in uncured resin, and that has to be washed away in solvent or, for water-washable resins, in water. The part is then cured under UV light for the time the resin supplier specifies. Skip the wash and uncured resin stays on the surface and on your hands. Skip the cure and the part stays soft and tacky and will not reach its stated properties.
Is resin printing safe to run in a small workshop?
With sensible precautions, yes. Uncured resin gives off volatile organic compounds and can cause skin sensitisation, so the printer needs ventilation or an enclosure with a carbon filter. Nitrile gloves and eye protection are standard, resin never goes down a drain, and waste resin and used solvent are cured solid before disposal. Treat the resin bench a little like a solvent bench and it stays manageable.
Can a resin printer produce patterns for casting?
Yes, and it is one of the strongest uses for the technology. Castable resins burn out of investment moulds with little residue, so a printed pattern can be cast in metal the way a wax pattern would be. Jewellers and dental labs use this route every day. The pattern needs a complete wash and cure, because uncured resin left inside it will leave residue and spoil the casting.