3D Print Post-Processing: Essential Techniques for Professional Results
Introduction to Post-Processing 3D Printed Parts
Post-processing 3D printed parts is an essential step in achieving professional-quality results from additive manufacturing. Regardless of the 3D printing technology used, nearly all printed parts require some degree of finishing to achieve the desired surface quality, appearance, or functional properties.
The specific post-processing techniques required depend heavily on the material used and the intended application of the finished part. Understanding which methods are appropriate for your specific material ensures efficient workflow and optimal results.
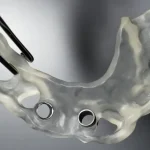
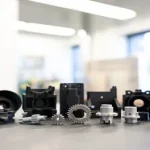
Post-processing transforms rough 3D printed parts into smooth, professional-quality components
Essential Post-Processing Techniques
Sanding 3D Printed Parts
Sanding is typically the first step in post-processing and is used to smooth surfaces, remove layer lines, and prepare parts for painting or filling. The process starts with coarse grit sandpaper, typically P100, to quickly remove material and flatten surfaces.
After initial sanding, progressively finer grits are used to refine the surface. Common grit progression includes P100 followed by P220, P400, and finally P600 or higher for a smooth finish. Wet sanding between grits helps prevent clogging and produces a finer finish.
For best results, sand in circular motions while regularly checking for scratches and imperfections. The goal at this stage is to create a uniform surface free from visible layer lines and blemishes.
Gap Filling and Putty Application
Gap filling addresses visible seams between printed layers, gaps at part boundaries, and imperfections that cannot be removed by sanding alone. Body filler or auto putty commonly used in automotive repair works well for filling gaps in 3D printed parts.
Apply thin layers of filler, allowing each layer to dry completely before sanding smooth. This process may need to be repeated multiple times to achieve a perfectly smooth surface. The key is to apply thin coats rather than a single thick coat, which can crack during sanding.
Priming and Spray Filling
Priming serves dual purposes: it provides excellent adhesion for subsequent paint layers and reveals surface imperfections that might not be visible on bare plastic. Spray primers designed for plastic surfaces work best for 3D printed parts.
Apply primer in light, even coats from approximately 20 centimeters away, using smooth sweeping motions. Allow each coat to flash dry before applying the next. Multiple thin coats produce better results than a single heavy coat, which can cause runs or uneven coverage.
A marker can identify areas requiring additional attention. Mark visible imperfections, sand those spots smooth, and reapply primer. This iterative process continues until the surface is ready for final painting.
Painting 3D Printed Parts
Painting is the final step that brings the part to its finished state. Base colors are applied first, followed by any additional details or weathering effects desired. Use paints compatible with the primer used, typically acrylic or enamel paints.
Apply paint in thin, even coats, building up color gradually. Rushing this step by applying thick coats leads to runs, orange peel texture, or poor adhesion. Each coat should be light enough to dry quickly without obscuring surface details.
For parts requiring different colors in specific areas, mask off sections with painter’s tape before spraying. Remove masking tape while the paint is still slightly tacky to avoid peeling cured paint from the surface.
Post-Processing by 3D Printing Material
PLA Post-Processing
Sanding: Easy, use progressive grits
Filling: Body filler works well
Painting: Acrylic paints adhere well
Notes: Lower heat resistance
ABS Post-Processing
Sanding: Moderate difficulty
Filling: Body filler suitable
Painting: Requires plastic primer
Notes: Can acetone smooth for glossy finish
PET-G Post-Processing
Sanding: Moderate, similar to ABS
Filling: Body filler works
Painting: Plastic-compatible paints
Notes: Good strength and durability
Material Selection for Post-Processing
Choosing the right 3D printing material affects how easily and effectively post-processing can be completed:
PLA: The easiest material to sand and finish, ideal for parts where aesthetics matter. Lower printing temperature makes it easier to achieve fine details, but it has lower heat resistance than other materials.
ABS: Offers excellent machinability and thermal stability. More prone to warping during printing but responds well to body fillers and paints. Can be smoothed with acetone vapor for a glossy finish.
PET-G: Provides good durability without the warping tendency of ABS. It bridges the gap between PLA ease of use and ABS mechanical properties, making it popular for functional prototypes.
Assembly and Gluing 3D Printed Parts
Larger prints often require assembly and gluing to create the final part. Before applying adhesive, dry fit all components to verify alignment and identify any adjustments needed.
Cyanoacrylate adhesives, commonly known as superglue, work well for joining 3D printed parts. Glue accelerators can speed up curing time when working with absorbent materials. Apply adhesive sparingly to avoid squeeze-out that can mar the surface.
For parts requiring structural reinforcement, consider using metal inserts, screws, or reinforcement brackets. These additions significantly improve the durability of assembled parts subjected to mechanical stress.
Reinforcing 3D Printed Parts
Parts subject to mechanical stress may require reinforcement beyond adhesive bonding. Common reinforcement methods include:
Metal rods or threaded inserts placed inside the part during printing
Epoxy or polyester resin applied to interior surfaces for added rigidity
Fiberglass cloth laminated with resin for high-strength applications
Bolted joints with washers and nuts for dismountable assemblies
When designing parts intended for reinforcement, plan for internal cavities or channels where reinforcement materials can be installed after printing.
Tips for Professional Results
Achieving professional post-processing results requires attention to detail and patience:
Work in a clean, dust-free environment to avoid contamination of surfaces
Allow adequate drying time between each step of the process
Use proper respiratory protection when sanding or working with chemicals
Keep a light source at a low angle to reveal surface imperfections
Practice on scrap parts before working on final pieces
Document your process for consistent results on future projects
Conclusion
Post-processing 3D printed parts transforms rough prints into professional-quality components suitable for presentation, functional testing, or end-use applications. The specific techniques required depend on your material choice and desired outcome.
Mastering the fundamentals of sanding, gap filling, priming, and painting enables you to consistently achieve excellent surface finishes on your 3D printed projects. With practice, these techniques become second nature and significantly expand what you can accomplish with additive manufacturing.
Thank you for signing up. You will be the first to know the Industry news, upcoming products, latest technology and special promotion.